Network > Protocol Settings > E-Mail/I-Fax Settings
*
E-Mail/I-Fax Settings

Remark
  • Optional equipment is required to use the e-mail/I-fax functions. For the equipment needed, see "Optional Equipment and System Requirements."
  1. On the Network Settings screen, press [E-mail/I-Fax].
  1. Specify the mail server for receiving e-mail/I-faxes.

The machine supports both the SMTP and POP3 functions.

The machine can receive I-fax images and communication error notices only.

  • If you want to receive e-mail/I-faxes using the machine's own SMTP receiving function:
  • If you want to receive e-mail/I-faxes using a POP server:

  • If you want to receive e-mail/I-faxes using the machine's own SMTP receiving function:
  • Register the host name of the machine with the DNS server → specify the following.

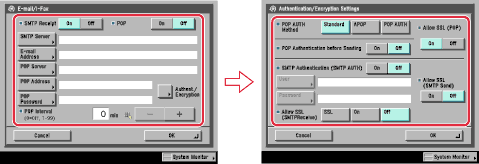
Press [On] for <SMTP Receipt> → press [Off] for <POP>.

In [E-mail Address], enter the e-mail address your machine will use. You can specify any user name (the part of the address located in front of the @ symbol). Enter the host name after the "@" symbol in the e-mail address.

If you select [SSL] for <Allow SSL (SMTP Receive)>, reception of only data encrypted using SSL is allowed and communications from the host not using SSL are rejected.

If you select [On] for <Allow SSL (SMTP Receive)>, depending on the request from the host, reception of data encrypted using SSL is allowed only when there is a request from the host.

  • Even if you select [On] for <Allow SSL (SMTP Receive)>, the data will not be encrypted if the SMTP host does not support encryption.
  • In order to select [SSL] or [On] for <Allow SSL (SMTP Receive)> to allow SSL transmission, it is necessary to generate a key pair in advance. For instructions on how to generate a key pair, see "Generating a Key Pair and Server Certificate."
  • Proceed To Next Step

  • If you want to receive e-mail/I-faxes using a POP server:
  • Press [On] for <POP> → press [Off] for <SMTP Receipt>.

In [E-mail Address], enter the e-mail address your machine will use.

In [POP Server], enter the IP address or name of the POP server using the keyboard on the touch panel display.

In [POP Address], enter the login name for access to the POP server.

In [POP Password], enter the password for access to the POP server.

Set [POP Interval] to the interval you want the POP server to check for incoming e-mail. If the interval is set to '0', the POP server is not checked automatically. For instructions on how to manually check the POP server, see "Using the Main Unit to Send/Receive."

Select the authentication method supported by the POP server from [Standard], [APOP], or [POP AUTH] for <POP AUTH Method>.

If you want to send encrypted data, press [On] for <Allow SSL (POP)>.

  • If the POP server does not support SSL encryption, data is not encrypted when [On] is selected for <Allow SSL (POP)>.
  • In order to select [On] for <Allow SSL (POP)> to allow SSL transmission, it is necessary to generate a key pair in advance. For instructions on how to generate a key pair, see "Generating a Key Pair and Server Certificate."
  • Proceed To Next Step

  1. Specify the mail server for sending e-mail/I-faxes.

  • If you are using an SMTP server that requires POP before SMTP (method for authenticating users who have logged in the POP server before sending e-mail):
  • If you are using an SMTP server that requires SMTP Authentication (method for authenticating users who have logged in the SMTP server before sending e-mail):
  • If you are using an SMTP server that does not require authentication for sending e-mail:

  • If you are using an SMTP server that requires POP before SMTP (method for authenticating users who have logged in the POP server before sending e-mail):
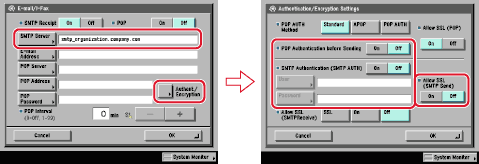
  • In [SMTP Server], enter the IP address or name of the SMTP server using the keyboard on the touch panel display.

Press [On] for <POP Authentication before Sending> → press [Off] for <SMTP Authentication (SMTP AUTH)>.


  • If you are using an SMTP server that requires SMTP Authentication (method for authenticating users who have logged in the SMTP server before sending e-mail):
  • In [SMTP Server], enter the IP address or name of the SMTP server using the keyboard on the touch panel display.

Press [On] for <SMTP Authentication (SMTP AUTH)> → press [Off] for <POP Authentication before Sending>.

In [User], enter the user name used for logging in to the SMTP server. If you are using a Microsoft SMTP server, enter the user name in [User] using the following format: user name@domain name.

In [Password], enter the password used for logging in to the SMTP server.

To encrypt data to be sent using SSL, select [On] for <Allow SSL (SMTP Send)>.

  • If the SMTP host does not support encryption, data is not encrypted when [On] is selected for <Allow SSL (SMTP Send)>.

  • If you are using an SMTP server that does not require authentication for sending e-mail:
  • In [SMTP Server], enter the SMTP server IP address or name using the keyboard on the touch panel display.

Press [Off] both for <SMTP Authentication (SMTP AUTH)> and <POP Authentication before Sending>.


  • Back To Top