Network > Communication Environment Setup
*
Communication Environment Setup

This section describes how to set up the environment for communication between the machine and computers on your network. If you are configuring the settings for the first time, use the control panel of the machine.

After configuring the settings, you can change them using software other than the control panel of the machine. For details, see "Network Setting Items."


Remark
  • [SNMP Settings] does not support AppleTalk networks.

  1. On the Network Settings screen, press [SNMP Settings] → specify the settings for SNMP v. 1.

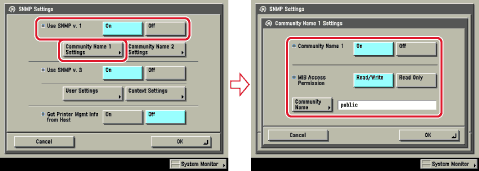
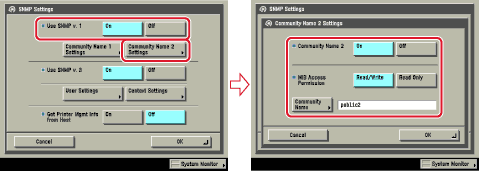
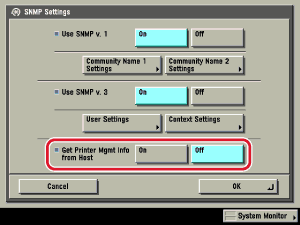
[On] for <Use SNMP v. 1>: Follow the procedure below to specify the MIB access permissions and community names.

  • The machine supports the SNMP v. 1 and SNMP v. 3 management functions. You can use them simultaneously. The [Read Only]/[Read/Write] functions of SNMP v. 1 and the security functions of SNMP v. 3, such as an encrypted communication path, enable you to manage devices more securely. The available combinations of SNMP v. 1 and SNMP v. 3 functions you can use are shown below:
    SNMP v. 1 SNMP v. 3 Description
    Use SNMP v. 1 MIB Access Permission Use SNMP v. 3
    On Read/Write On/Off You can set or browse each item of the machine with a utility that uses SNMP v. 1 to obtain information. As the write access with SNMP v. 1 is enabled, the security functions of SNMP v. 3 are not available, regardless of the settings for <Use SNMP v. 3>.
    On Read Only On You can only browse each item of the machine with a utility that uses SNMP v. 1 to obtain information. Only users who have been assigned access rights can set each item of the machine with a utility that uses SNMP v. 3.
    On Read Only Off You can only browse each item of the machine with a utility that uses SNMP v. 1 to obtain information.
    Off - On Only users who have been assigned access rights can set or browse each item of the machine with a utility that uses SNMP v. 3.
    Off - Off You cannot set or browse each item of the machine with a utility.
  • If you want to use a Canon printer driver or utility, press [On] for both <Use SNMP v. 1> and [Enable Dedicated Port].
  • You can restrict the IP addresses of computers on which items can be set or browsed. If you restrict the IP addresses, it is not possible to set or browse detailed information concerning the machine on computers other than those whose IP addresses are allowed, even if <Use SNMP v. 1>, <Use SNMP v. 3>, and [Enable Dedicated Port] are 'On'. For details, see "TCP/IPv4 Settings," or "TCP/IPv6 Settings."
  • If you want to specify a Community Name 1
  • If you want to specify a Community Name 2

  • If you want to specify a Community Name 1
  • Press [Community Name 1 Settings] → [On] → specify the settings for <MIB Access Permission> and the community name in [Community Name].

You can also change the community name in [Community Name] to a name other than 'public'.

  • Proceed To Next Step

  • If you want to specify a Community Name 2
  • Press [Community Name 2 Settings] → [On] → specify the settings for <MIB Access Permission> and the community name in [Community Name].

You can also change the community name in [Community Name] to a name other than 'public2'.

  • Proceed To Next Step

  1. Specify the settings for SNMP v. 3.

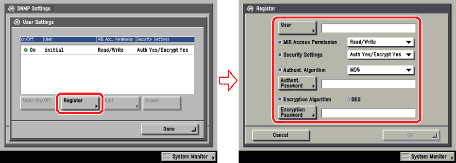
[On] for <Use SNMP v. 3>: Specify the user and context according to the following procedures.

  • An SNMP v. 3 user with the following settings is registered by default. Delete or change these settings as necessary.
  • User: initial
  • MIB Access Permission: Read/Write
  • Security Settings: Auth Yes/Encrypt Yes
  • Authent. Algorithm: MD5
  • Authent. Password: initial
  • Encryption Password: initial
  • If you want to add an SNMP v. 3 user:
  • If you want to confirm or change the SNMP v. 3 user settings:
  • If you want to erase an SNMP v. 3 user:
  • If you want to change the status of an SNMP v. 3 user:
  • If you want to edit the context:

  • If you want to add an SNMP v. 3 user:
  • Press [User Settings] → [Register] → specify the user name, MIB permissions, and security settings.

If you select [Auth Yes/Encrypt Yes] from the Security Settings drop-down list, select the authentication algorithm → enter the passwords for authentication and encryption. If you select [Auth. Yes/Encrypt. No] from the Security Settings drop-down list, select the authentication algorithm → enter the password for authentication.

  • Proceed To Next Step

  • If you want to confirm or change the SNMP v. 3 user settings:
  • Press [User Settings] to select the user whose settings you want to confirm or change → press [Details/Edit].

Confirm the displayed information → change the settings if necessary.

  • Proceed To Next Step

  • If you want to erase an SNMP v. 3 user:
  • Press [User Settings] to select the user whose settings you want to erase → press [Erase].
  • Proceed To Next Step

  • If you want to change the status of an SNMP v. 3 user:
  • Press [User Settings] → select the user whose status you want to change → press [User On/Off].
  • Proceed To Next Step

  • If you want to edit the context:
  • Press [Context Settings] → edit the context.

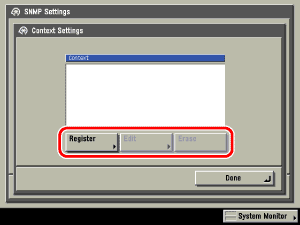
If you want to add a context, press [Register] to add a new context. If you want to change a context, select the context you want to change → press [Edit] to change the context. If you want to erase a context, select the context you want to erase → press [Erase].

  • A context named 'NULL' is registered by default. The 'NULL' context cannot be deleted, and is not displayed on the Context Settings screen.
  • Proceed To Next Step
  1. Set monitoring for the printer management information.

[On] for <Get Printer Mgmt Info from Host>: If you are using Windows Vista and set [Standard TCP/IP port] for the printer driver port, the SNMP port monitoring function will be enabled automatically to obtain printer management information such as information on print applications and printer ports.

  1. On the Network Settings screen, press [Enable Dedicated Port] → specify the following.

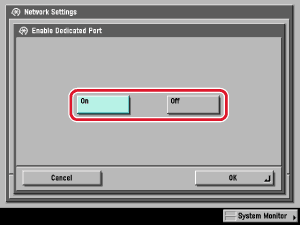
[On]: You can set or browse detailed information on the machine with a Canon printer driver or utility (UFR II/PCL/PS printer drivers, NetSpot Device Installer, etc.).

  • If you want to use a Canon printer driver or utility, press [On] for both <Use SNMP v. 1> and [Enable Dedicated Port].
  • You can restrict the IP addresses of computers on which items can be set or browsed. If you restrict the IP addresses, it is not possible to set or browse detailed information concerning the machine on computers other than those whose IP addresses are allowed, even if <Use SNMP v. 1>, <Use SNMP v. 3>, and [Enable Dedicated Port] are 'On'. For details, see "TCP/IPv4 Settings," or "TCP/IPv6 Settings."
  1. On the Network Settings screen, press [Use Spooler] → specify the following.

[On]: You can spool print jobs transmitted to this machine on the machine's hard disk. Set the spooler if you are using the optional UFR II Printer Kit, the optional UFR II/PCL Printer Kit, the optional PCL Printer Kit, the optional PS Printer Kit, or the optional Super G3 FAX Board.

  • If the optional PS Printer Kit is activated, take note of the following:
  • If the print job is sent from a Macintosh computer to a PS printer, you cannot specify whether to spool under this option. Spooling is determined by the name of the printer selected in the Macintosh screen. For more information, see "Setting Up a Computer for Printing."
  • If you print a file in PDF or PS format by specifying its URL on the Remote UI, the print job will always be spooled, regardless of the settings made under this option.
  • When you spool a print job on the machine's hard disk, the time required to release a computer outputting a print job is shortened.

  • Back To Top