0WR8-0E8
 |
|
Information such as files in the Advanced Box or Mail Box, Address Book data, existing job data, and password information can be saved to the hard disk of the machine. The machine encrypts this information (HDD data encryption), preventing it from being read by unauthorized users. The machine is also equipped with the Canon MFP Security Chip 2.10, which complies with the FIPS 140-2 Level 2 security standard established by the U.S. government. The Canon MFP Security Chip 2.10 is certified as a cryptographic module under the Cryptographic Module Validation Program (CMVP) established by the U.S. and Canada, as well as the Japan Cryptographic Module Validation Program (JCMVP). The certification given to the Canon MFP Security Chip 2.10 ensures that results of the standardized test show the conformity of the test subject with the prescribed standards.
|
|
IMPORTANT
|
|
HDD data encryption on the machine may not be able to protect data from all unauthorized activity. Exercise caution when managing data.
Encrypted data cannot be read even if you remove the hard disk and install it in another Canon multifunction printer.
|
|
NOTE
|
|
This machine generates 256-bit encryption keys using a NIST SP 800-90A random number generation method. For encryption, the machine uses an AES algorithm in accordance with FIPS PUB 197.
When the optional HDD Mirroring Kit is attached, the data that is written to the two hard disks is encrypted. For more information, see System Options.
|
Copied or scanned image data, as well as document data that is printed from a computer, is temporarily stored on the hard disk. Although the document data and image data is automatically deleted from the hard disk when operations are complete, some data remains. You can further improve security by using the hard disk data complete deletion function to automatically delete any data that remains after operations are complete.
|
IMPORTANT
|
|
You cannot use the machine while unnecessary data is being deleted. After data deletion is complete, it may take some time before the machine is ready to scan documents.
The machine's processing capacity may decrease when data is deleted.
|
|
NOTE
|
|
Initialize the data and settings to delete data such as files stored in the Mail Box, Address Book information, or copy and print log information. Initializing All Data/Settings
|
1
Press  .
.
 .
.2
Press <Management Settings>  <Data Management>
  <HDD Data Complete Deletion>.
 <Data Management>
  <HDD Data Complete Deletion>.
3
Press <Hard Disk Data Complete Deletion>  <On>
<On>  <OK>.
<OK>.
 <On>
<On>  <OK>.
<OK>.4
Specify how to delete the data.
 Setting the deletion timing
|
1
|
Press <Timing of Deletion>.
|
|
2
|
Select the deletion timing, and press <OK>.
Select <During Job> to delete data immediately after each process is complete, or select <After Job> to wait until all operations are complete and delete all unnecessary data together.
|
 Setting the deletion method
|
1
|
Press <Overwrite Method for Deletion Mode>.
|
|
2
|
Select the deletion method, and press <OK>.
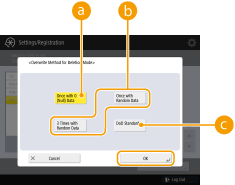
To prevent the leakage of sensitive data when replacing or disposing of the hard disk, overwrite it with 0 (null) data, random data, or a fixed value (such as 0xff). Select the overwrite method and the number of times to overwrite, based on the information security policy requirements of your environment.
  <Once with 0 (Null) Data> <Once with 0 (Null) Data>Data is overwritten once with 0 (null) data.
 <Once with Random Data>/<3 Times with Random Data> <Once with Random Data>/<3 Times with Random Data>Data is overwritten once or three times with random data.
 <DoD Standard> <DoD Standard>Data is overwritten three times. The first time is with a fixed value, the second is with a complement of the fixed value, and the third is with random data.
|
|
3
|
Press
    <Apply Set. Changes> <Apply Set. Changes>  <Yes>. <Yes>. |


