Send/Fax > Using the Main Unit to Send/Receive > Overview of the iR3245/iR3235/iR3230/iR3225
*
Overview of the iR3245/iR3235/iR3230/iR3225

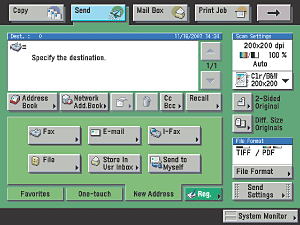
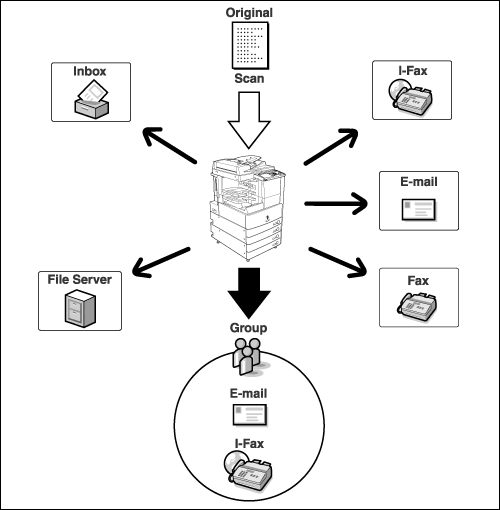
If you press [Send], the Send Basic Features screen appears. The Send function enables you to scan documents and send them to specified destinations via fax, e-mail, or I-fax, save them to a file server, or store them in an inbox to process them at a later date. You can also send documents to multiple destinations simultaneously using various sending methods, such as e-mail and I-fax.

Depending on the installed or activated options, the Send Basic Features screen is displayed as follows:


If only the Color Universal Send Kit is activated, it is displayed as [Send].


If only the fax board is installed, it is displayed as [Fax].


If the Color Universal Send Kit is activated and the fax board is installed, it is displayed as [Send].

Depending on the destination, the following conditions must be met:

  • E-mail, I-fax, file server: The optional Color Universal Send Kit is activated
  • Fax: The optional fax board is installed
  • Inbox: The optional Color Universal Send Kit is activated or the optional fax board is installed

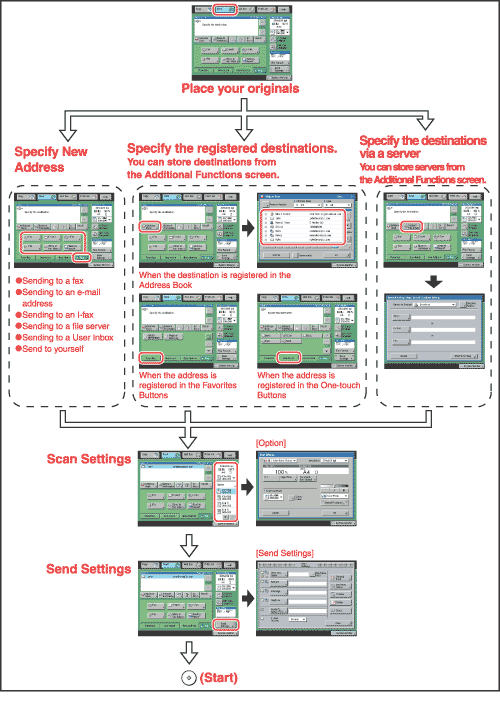
The Flow of the sending is as follows.


Remark
  • Network settings must be specified to be able to send scanned documents to an e-mail address, an I-fax address, or a file server. (See "Network.")

  • Send Basic Features Screen

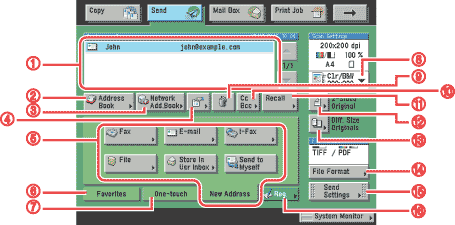
The screen below, which appears when [Send] is selected, is called the Send Basic Features screen.

1

Destination List
Displays a list of destinations.

9

Erase
Press to erase the destination displayed in the destination list.

2

Address Book
Press to select a destination from the Address Book.

10

Cc Bcc
Press to specify the e-mail address as a Cc or Bcc destination.

3

Network Address Book
Press to search a destination from the LDAP server.

11

Recall
Press to recall previously set send jobs, including the destinations, scan settings, and send settings.

4

Details
Press to check or change the destination information selected from the destination list.

12

2-Sided Original
Press to scan both sides of the original.

5

New Address Tab
Press to specify a destination not stored in the Address Book.

13

Different Size Originals
Press to scan differently sized originals together.

6

Favorites Tab
Press to recall the destinations and settings stored in a favorites button.

14

File Format
Press to select the file format of the document you are going to send (TIFF, JPEG, PDF, or XPS).

7

One-touch Tab
Press to recall the destinations stored in a one-touch button.

15

Send Settings
Press to set the send settings. You can specify various settings, such as setting the document to be sent at a specified time, entering a subject for an e-mail message or an I-fax, or entering the sender's name for fax.

8

Scan Settings drop-down list
Press to select the scan mode.

16

Register
Press to register new destinations in the Address Book, one-touch buttons, or favorites buttons from the Send Basic Features screen.

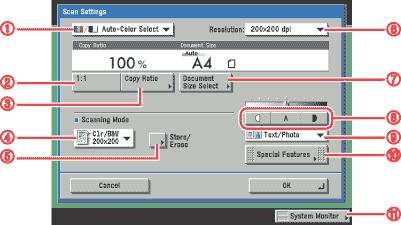
  • Scan Settings Screen

The screen below, which appears when you press [Option] from the Scan Settings drop-down list, is called the Scan Settings screen. Display this screen to set the scan settings for sending documents.

1

Color Mode drop-down list
Press to select the color mode for scanning.

7

Document Size Select
Press to select the size of the original that you want to scan.

2

Direct
Press to return the scan ratio to 100%.

8

Scan Exposure
Press [] or [] to manually adjust the scan exposure. Press [A] (Auto) to select or cancel the automatic scan exposure adjustment.

3

Copy Ratio
Press to scan originals at a different scan (zoom) ratio.

9

Original Type drop-down list
Press to select the type of original (Text/Photo, Photo, or Text) that you are going to scan. You can also select the type of photo ([Printed Image] or [Photo]) if Photo Mode in TX Settings under <Common Settings> in Communications Settings (from the Additional Functions screen) is set to 'On'.

4

Scanning Mode drop-down list
Press to select a stored scan mode and resolution.

10

Special Features
Press to select and use the Special Features modes available for scanning.

5

Store/Erase
Press to store or erase a scan mode.

11

System Monitor
Press to check the status or details of a send or receive job, or to cancel a job.

6

Resolution drop-down list
Press to select the resolution.


  • Back To Top