0WR8-070
1
Press <Hold> on the Main Menu. <Main Menu> Screen
2
Select a document.

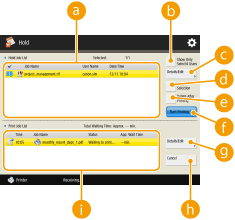
 <Hold Job List>
The selection status of documents, icons indicating document types, names and dates/times of saved documents are displayed.
When a document is selected,  which indicates "selected" is displayed. When multiple documents are selected, the numbers in the center of
  are displayed as 1, 2, 3 … in the order selected. When you press a selected document, the selection is canceled.
The printed document is moved to the list  , and then you can check the printed statement.
 , and then you can check the printed statement.
 <Show Only Select'd Users>/<Display All Users>
Displays the documents of the selected user or all users.
 <Details/Edit>
You can edit/check the job ticket of the selected document, check the printing contents, change the final condition setting, etc.
NOTE:
The job ticket is JDF (Job Definition Format) attribute information included in a document through the entire printing process. Some apply to the entire document and others apply to each page range divided by page. As for editing/checking the job ticket, you can confirm the steps one by one.
 <Select All>/<Clear Selection>
If a document is not selected in  , <Select All> is displayed. You can select the documents being displayed at the same time. When documents are selected, <Clear Selection> is displayed. You can cancel the entire selection.
 , <Select All> is displayed. You can select the documents being displayed at the same time. When documents are selected, <Clear Selection> is displayed. You can cancel the entire selection.
 <Delete After Printing>
Deletes printed documents from <Hold Job List> automatically after printing.
 <Start Printing>
Excutes printing.
 <Details/Edit>
You can choose for a selected document to be printed preferentially or see the details.
 <Cancel>
Cancels printing.
 <Print Job List>
Icons indicating the printing status of documents, the current status, and waiting time are displayed.
3
Set in accordance with the purpose.
 Checking the printed material in the test print (Print Sample)
|
1
|
Press <Details/Edit>
 <Print Sample>. <Print Sample>. |
|
2
|
Set the number of copies and partition.
Depending on the document, the partition cannot be set.
|
|
3
|
Press <Start Printing>.
Printing starts.
|
|
4
|
Press <Close>.
|
 Checking the contents of the document (Display Image)
|
1
|
Press <Details/Edit>
 <Display Image>. <Display Image>. |
 Deleting a document
|
1
|
Press <Details/Edit>
 <Delete>. <Delete>. |
4
Press <Start Printing>.
Printing starts.
If <Delete After Printing> is not selected, the document remains in the list even after it is printed.


